Form Handling and Validation in React: `useForm` Hook

Opensource | Web Developer
Introduction
Recently, I was working on a project and I ran into a problem with a form with multiple input fields that were giving the same error message even when the user left the different required fields blank.
To fix this problem, I started exploring and researching different options. That's when I discovered the useForm hook in React, a powerful tool for handling form logic and validation. With the useForm hook, I was able to fix the problem and make it clear to the users why the error was happening. This is my story of how I discovered the useForm hook and how it improved my development and user experience.
Understanding Form Validation and Logic
To make things easier and understand it practically let us take an example:
Imagine you're building a sign-up form for a website, one of the crucial pages on the website, where users can enter their personal information to create an account. Without the useForm hook, handling form logic and validation on the signup page would be a difficult task.
In a standard sign-up form, What do you need?
Email
Password
Confirm Password

Now, that you have identified what all input fields are required. Let's analyse what should be the conditions for these inputs from the user.
The email should be a valid email (
example@gmail.com)Password must be at least 8 characters long
'Confirm Password' must match the password
Objective
To give
errorswheninputfields are empty
To show
errorwhen the above conditions are not fulfilled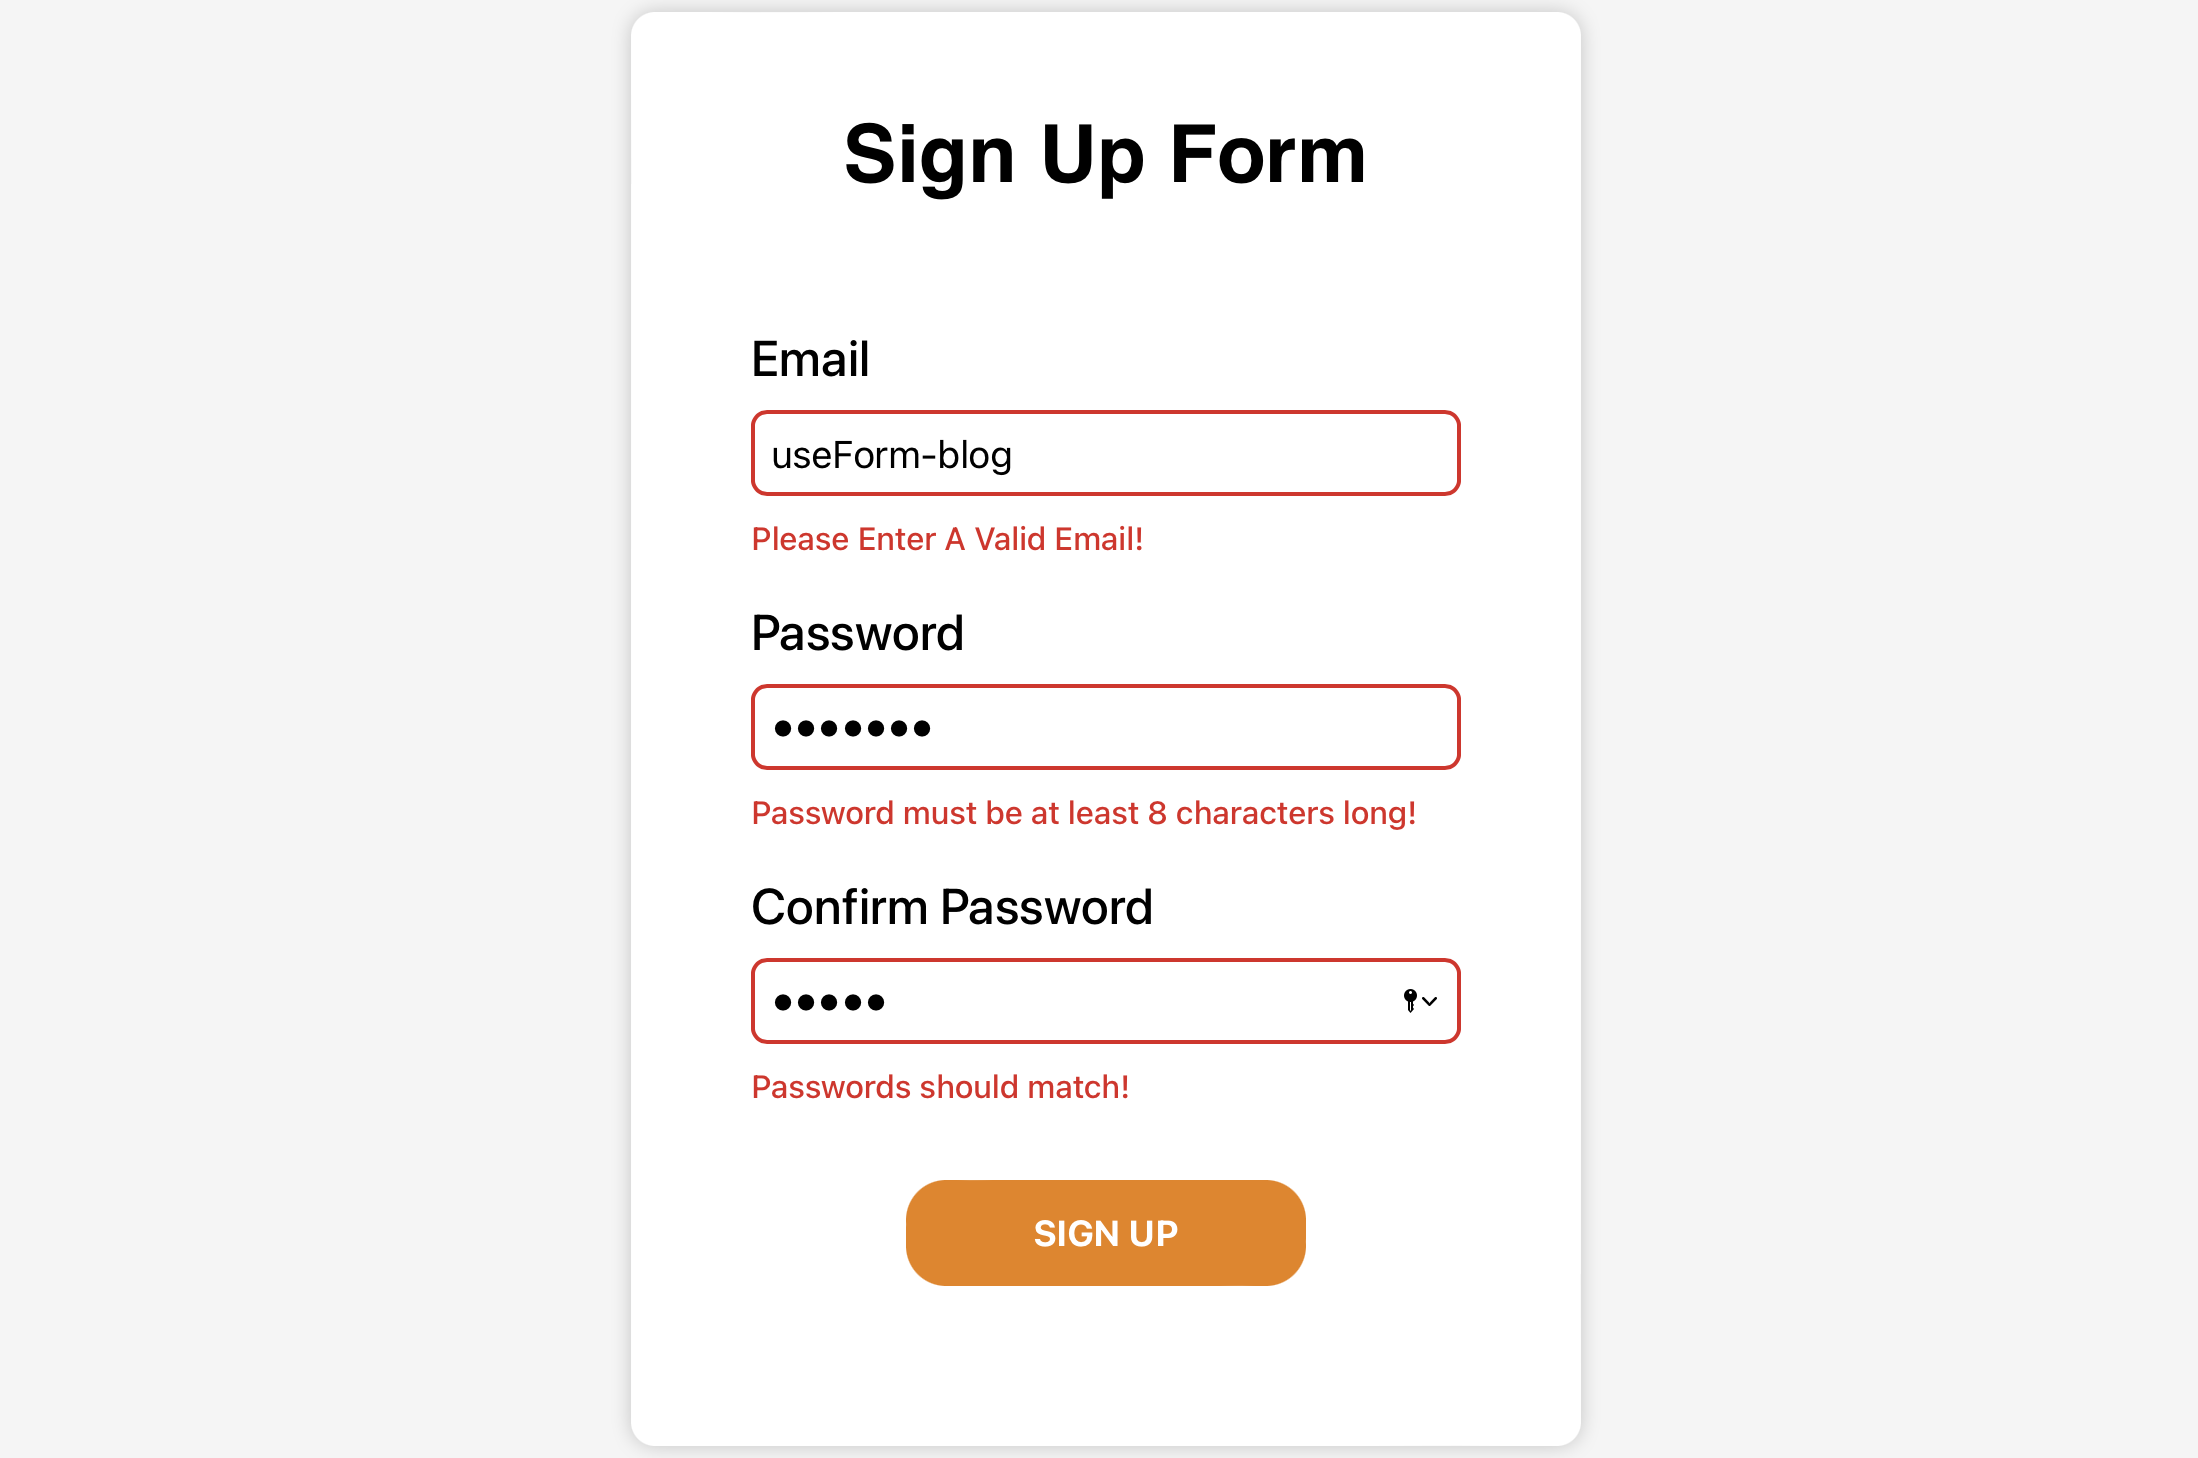
To handle this (without useForm) :
Firstly, you would have to write your own validation logic to check that all the required fields are filled out and that the information is entered in the correct format. For example, if the user is supposed to enter an email address, you would have to write the code to check that it's a valid email address. This would require a lot of repetitive code and would be prone to errors.
Secondly, you would have to handle form submissions manually. This would mean writing code to handle the user's input and send it to the server for processing. This would also require a lot of repetitive code and would be time-consuming.
But with the useForm hook, handling form logic and validation is a breeze.
Here's how:
The hook provides several methods, the ones we will be using are register, handleSubmit, getValues and formstate
register
The register method allows you to register an input field with the hook and define its validation rules and other properties.
Looks like the below.
const { register} = useForm();

<form>
    <input {...register(name, options)} />
</form>
-> the name parameter is used to specify the name of the input field, which allows easier access to the value of that field in the formState object.
register("email")
output -> {email: valueOfTheReferencedInput}
-> the options passed will be used to define the validation rules for the input.
register("email", {
    required: true,
    onChange: () => console.log("this is email address")
})
handleSubmit
When the form is submitted, the handleSubmit method will first validate all the input fields. If any validation errors occur, the form submission will be prevented and the errors will be displayed to the user.
If there are no validation errors, the handleSubmit method will call the callback function passed to it as a parameter. This function can be used to handle the form data and send it to the server for processing.
const { register, handleSubmit } = useForm();

<form onSubmit={handleSubmit(() => console.log("form is successfully validated and sent to server for processing"))}>
  ...
</form>
getValues
The getValues method is used to retrieve the current values of all the input fields, so that there is no need to useState them.
const { register, getValues } = useForm();

<form>
    <input value="example email"{...register("email")} />
</form>

const emailInput = getValues("email")
console.log("emailInput") // output -> "example email"
formState
The formState object is used to access the current state of the form, including the values of the input fields, the errors, and other properties like isSubmitting, isValid, touched, errors and many more. For this example, we are interested in errors only.
const {register, formState: {errors}} = useForm()

<form>
  <p>
    {errors.email?.message}
  </p>
  <input {...register("email")}/>
</form>
Let's Apply this
First, we need to register our inputs with the register method, so go ahead and do that:
Note: that we don't need to have name attribute in our inputs since it is handled by register method.
import {useForm} from "react-hook-form"

function App() {
 const {register} = useForm();

 return (
    <form>

      {/* email */}
      <input {...register("email")} type="email" id="email" />

      {/* password */}
      <input {...register("password")} type="password" id="password" />

      {/* confirm password */}
      <input {...register("confirmPassword")} type="password" id="confirmPassword" />
        </form>
    )
}
Now we need to give each one of them the validation conditions.
- For Email: It is required and It must be a valid email, so we can use
requiredandpattern.
 <input {...register("email"), {
        required: "Please Enter Your Email!",
        pattern: {
            value: /^[A-Z0-9._%+-]+@[A-Z0-9.-]+\.[A-Z]{2,}$/i,
            message: "Please Enter A Valid Email!"
        }
    }} type="email" id="email" />
If the user did not type his email, the errors object from the formState will contain the message we typed with the required property, And if the email is not valid errors will contain the message from pattern.
Now we can show the error message.
<input ... />
<p className="error-message">{errors.email?.message}</p>
- For Password: It is required and it must be longer than 8 characters
<input {...register("password"), {
        required: "Please Enter Your Password",
        minLength: {
        value: 8,
        message: "Password must be at least 8 characters long!"
        }
    }} type="password" id="password" />
To show error message.
<input ... />
<p className="error-message">{errors.password?.message}</p>
- For Confirm Password: This one is special because it only needs to match the password for validation to meet the condition, so we can use
validateoption's method, we also needgetValueto get the password value.
<input {...register("confirmPassword", {
        validate: (match) => {
            const password = getValues("password")
            return match === password || "Passwords should match!"
        }
    })} type="password" id="confirmPassword" />
To show error message.
<input ... />
<p className="error-message">{errors.confirmPassword?.message}</p>
Now we're finished with the validation! It's time to use handleSubmit.
<form onSubmit={handleSubmit(() => console.log("user registered successfully!"))}>
    ...
</form>
Voila🥳, we did that so easily and quickly!
To refer to the whole code -
import { useForm } from "react-hook-form";

function UseformApp() {
  const {
    register,
    handleSubmit,
    getValues,
    formState: { errors },
  } = useForm();
  return (
    <div className="container">
      <form
        onSubmit={handleSubmit(() =>
          console.log("user registered successfully!")
        )}
      >
        <h1>Sign Up Form</h1>
        {/* email */}
        <div className="inputContainer">
          <label htmlFor="email">Email</label>
          <input
            {...register("email", {
              required: "Please Enter Your Email!",
              pattern: {
                value: /^[A-Z0-9._%+-]+@[A-Z0-9.-]+\.[A-Z]{2,}$/i,
                message: "Please Enter A Valid Email!",
              },
            })}
            type="email"
            id="email"
            className={`${errors.email && "input-error"}`}
          />
          <p className="errorMes">{errors.email?.message}</p>
        </div>

        {/* password */}
        <div className="inputContainer">
          <label htmlFor="password">Password</label>
          <input
            {...register("password", {
              required: "Please Enter Your Password",
              minLength: {
                value: 8,
                message: "Password must be at least 8 characters long!",
              },
            })}
            type="password"
            id="password"
            className={`${errors.password && "input-error"}`}
          />
          <p className="errorMes">{errors.password?.message}</p>
        </div>

        {/* confirm password */}
        <div className="inputContainer">
          <label htmlFor="confirmPassword">Confirm Password</label>
          <input
            {...register("confirmPassword", {
              required: "Please Confirm Your Password",
              validate: (match) => {
                const password = getValues("password");
                return match === password || "Passwords should match!";
              },
            })}
            type="password"
            id="confirmPassword"
            className={`${errors.confirmPassword && "input-error"}`}
          />
          <p className="errorMes">{errors.confirmPassword?.message}</p>
        </div>

        {/* button */}
        <button>SIGN UP</button>
      </form>
    </div>
  );
}

export default UseformApp;
Conclusion

In conclusion, the useForm hook is an essential tool for handling form logic and validation in React and Typescript applications. By using the useForm hook, you can easily validate form inputs, check for errors and display error messages to the user, making the signup process smoother and more user-friendly. Additionally, it also makes it easy to handle multiple forms within a single component, making the development process more efficient and enjoyable.
Leave a comment and let me know how my blogs can be improved to make your development experience better!
Thank you for reading this blog.


